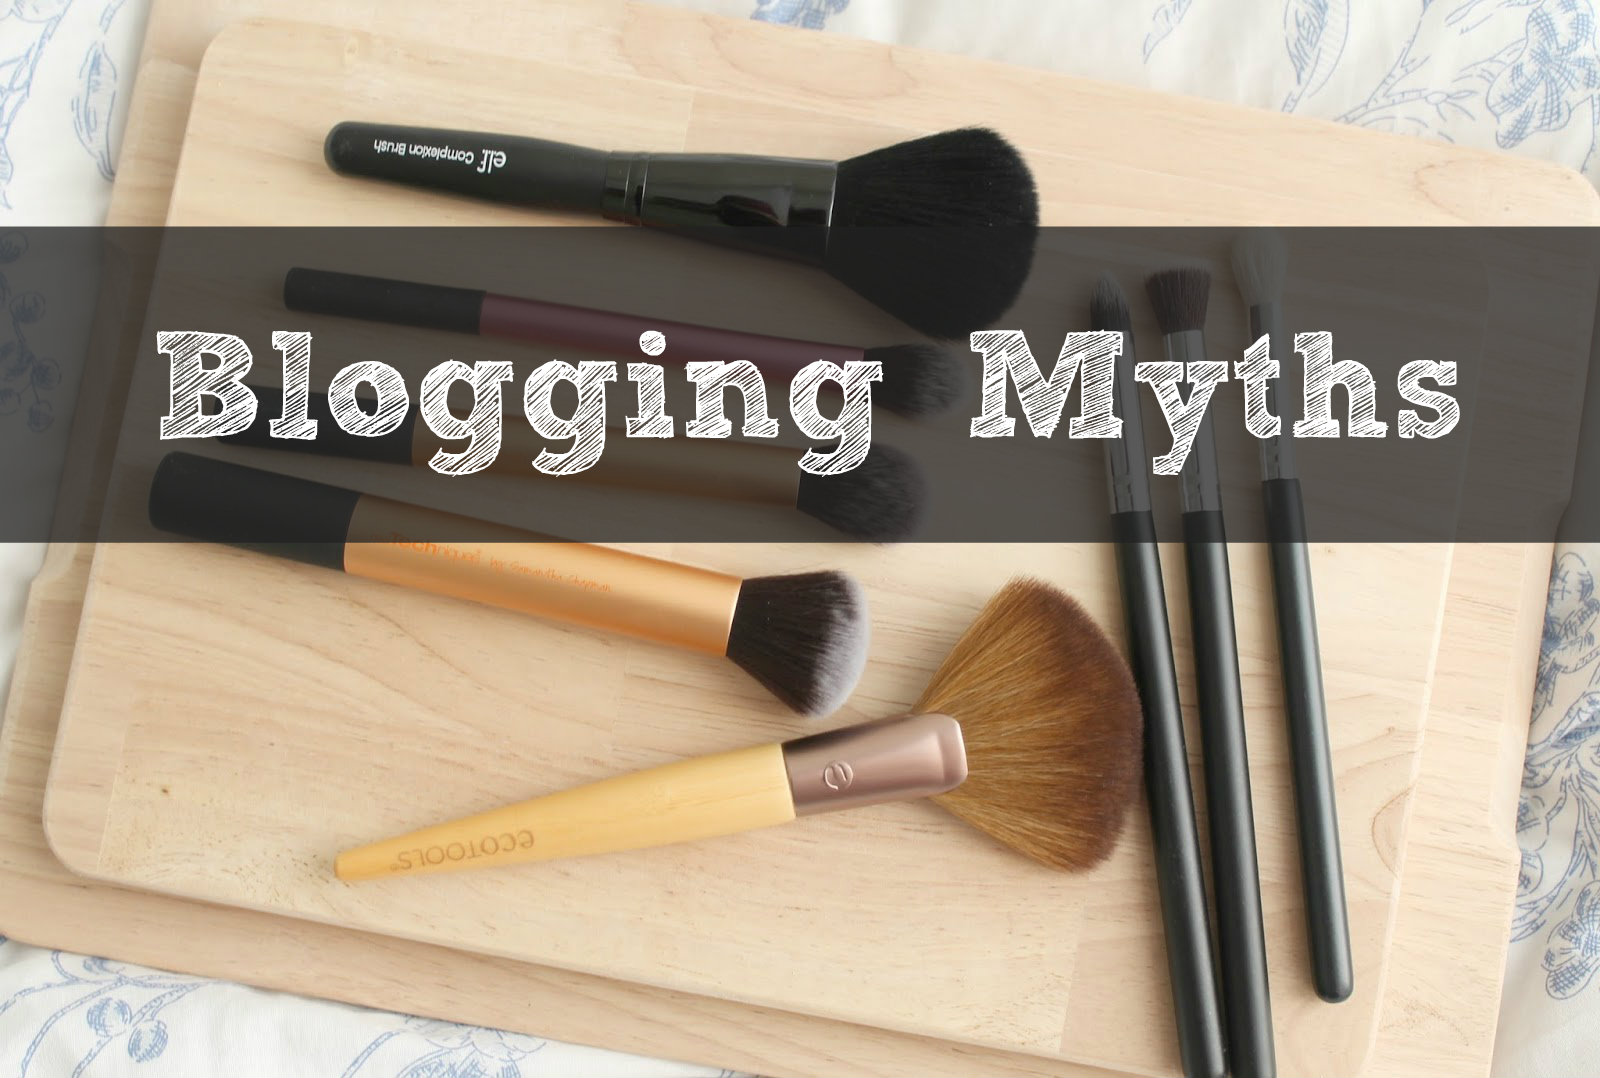
A FEW BLOGGING MYTHS…

1. Blogging will get you lots of ‘freebies’.
One of the perks of blogging is receiving things to review free of charge. Having said that, theres no guarantee just because you have a blog, you’re going to receive lots of products. The reality is that there are far more bloggers than samples. Blogs that only start for the purpose of getting products wont last long. Yes, if you work hard at your blog, put out great content and have passion then opportunities are likely to appear but they shouldn’t be expected or taken for granted.

2. Looking like a supermodel will get you lots of subscribers.
Now, this is a tough one because for fashion blogging then I guess looks do play a part somewhat. However, you don’t need to look a certain way to gain a readership. I read lots of blogs and for most of them, I have no idea what the writer looks like. If your content is good then people will read it. I’ve never read a blog because of what the writer looks like, maybe they are some people who do but in my honest opinion those people will get bored very easily if they’re not there for the content.

3. You need to make youtube videos to be a blogger.
A lot of bloggers upload videos on youtube. It’s something I considered until I actually got in front of a camera and froze – yep its not for me and I highly doubt I ever will. If its something you want to do then definitely give it a go. However, its not necessary and it doesn’t make you any less of a blogger because you’re not on there. I think some people think they’ll automatically become the next Zoella but it takes a lot of hard work and in all honesty a lot of likability (and luck?) to become successful on youtube.

4. Blogging will make you rich?
Well if only!Ha but seriously blogging isn’t an easy path to make money. Yes there are ways to monetise your blog and some people are lucky enough to earn a living from it. However, for most blogging is a great hobby.

5. You need money to be a blogger.
You dont need a lot of money to blog. You can have a read of my post on blogging when you’re broke here. There are lots of things you can blog about without spending a penny. Its easy to think that you need to go out and buy every new product to review but you really don’t. Try and think outside the box when it comes to writing.

6. Blogging is easy.
Before blogging, I never realised just how much time it takes to create a blog and all the things that come with it. You’re a content creator, editor, admin, social media, all in one blogging machine and that eats up a lot of time. Yes its very enjoyable but like everything, it has its ups and downs, frustrations and all that jazz. If you’re passionate then investing time and energy is 100% worth it!

7. Everyone lives in a dreamland of white walls, candles, flowers and cosy bedding.
Despite how things often look on blogs/social media, no-one has a perfect life or lives in a dream house filled with incredible things. Remember people only show snippets – everyone has their bad days and has their own struggles. In reality, I’m sure most bloggers are just like you and me and no-one is perfect despite perceptions.…
15 mac eyeshadow swatches & dupes

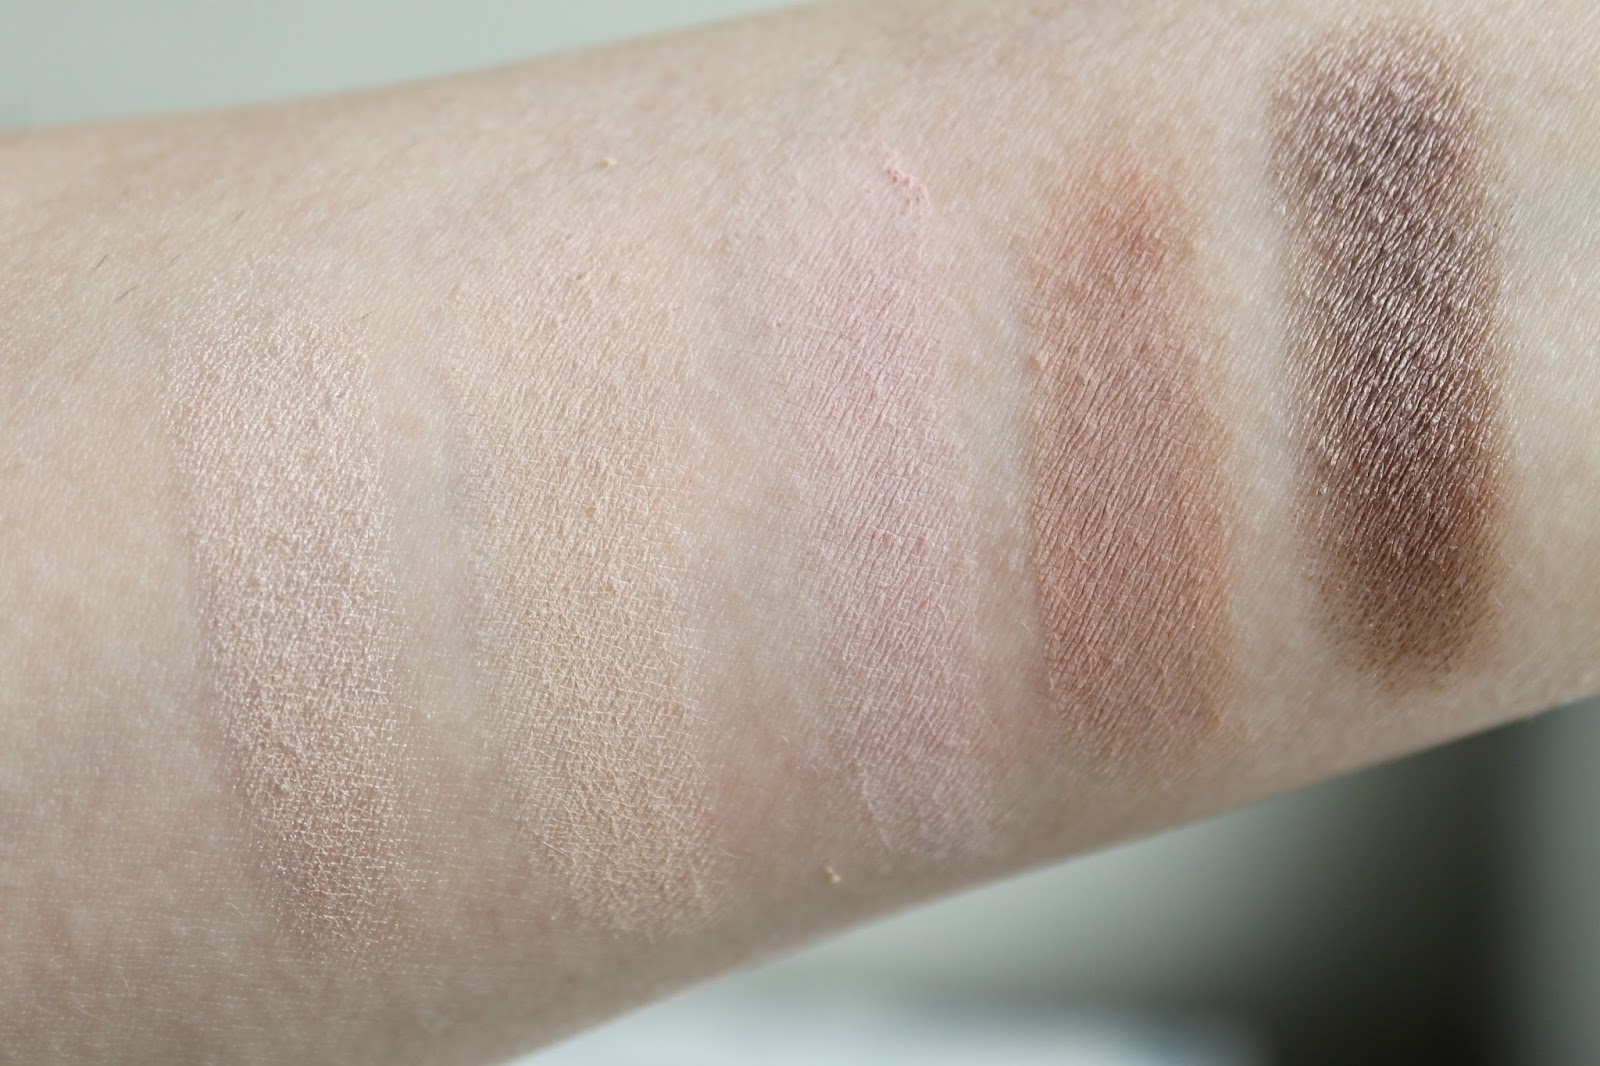
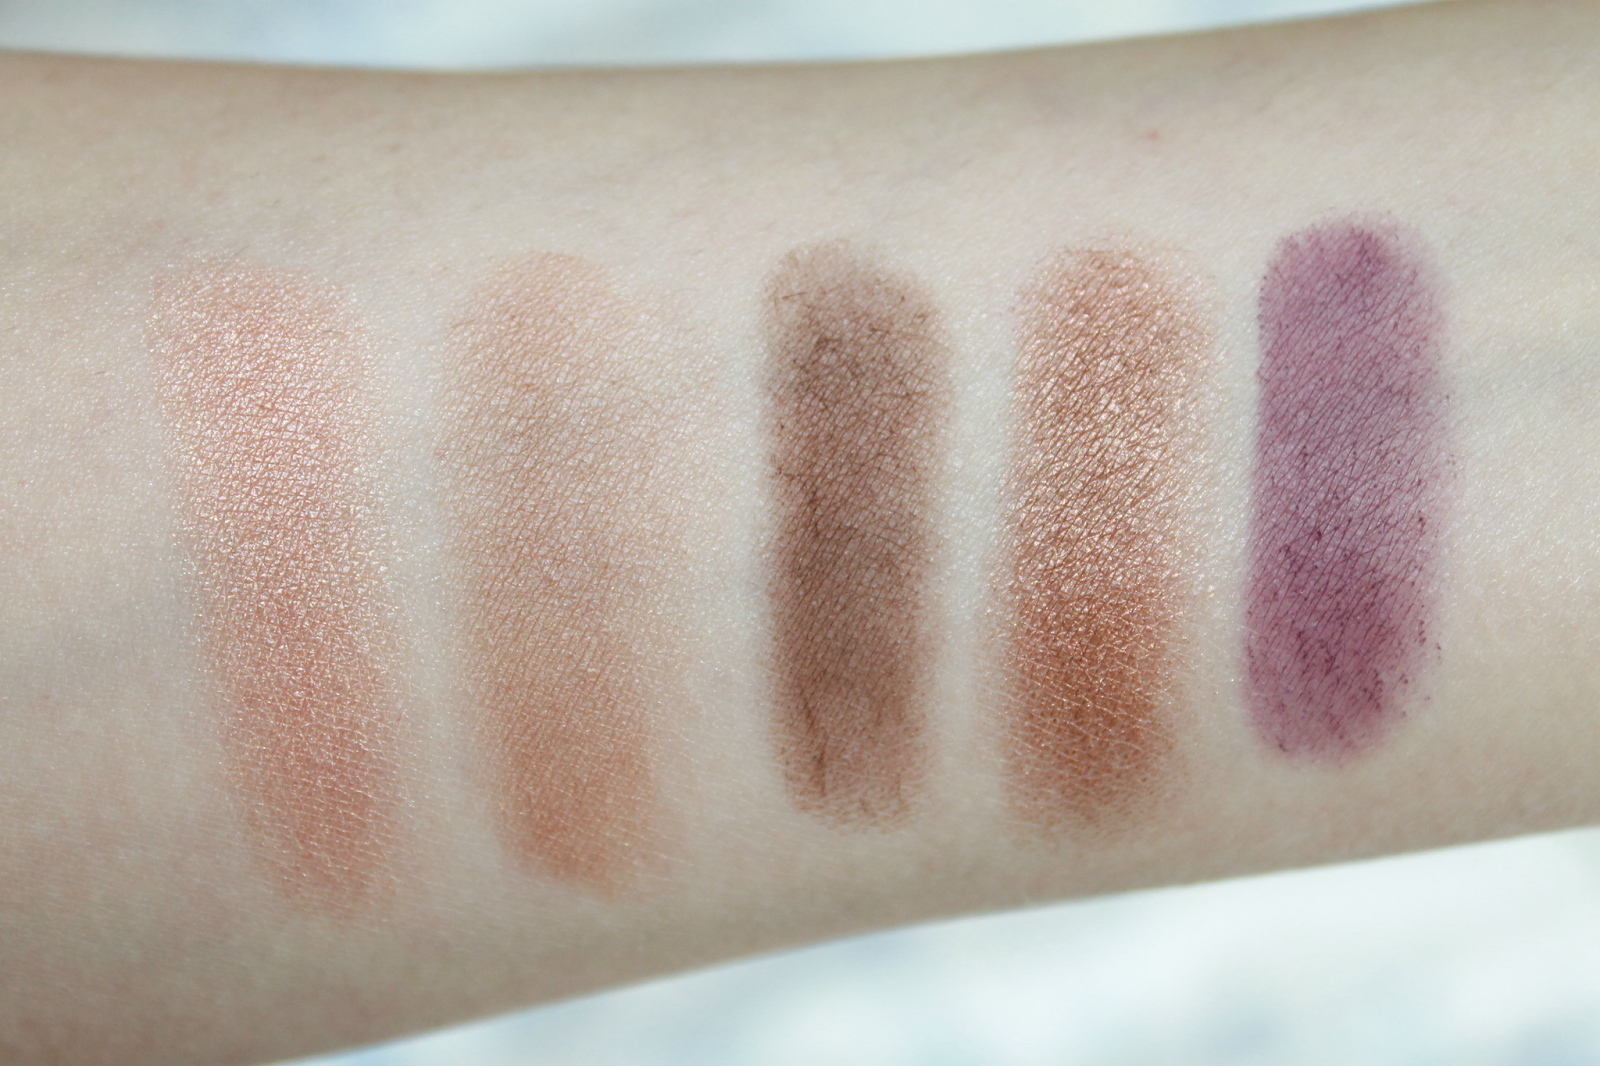
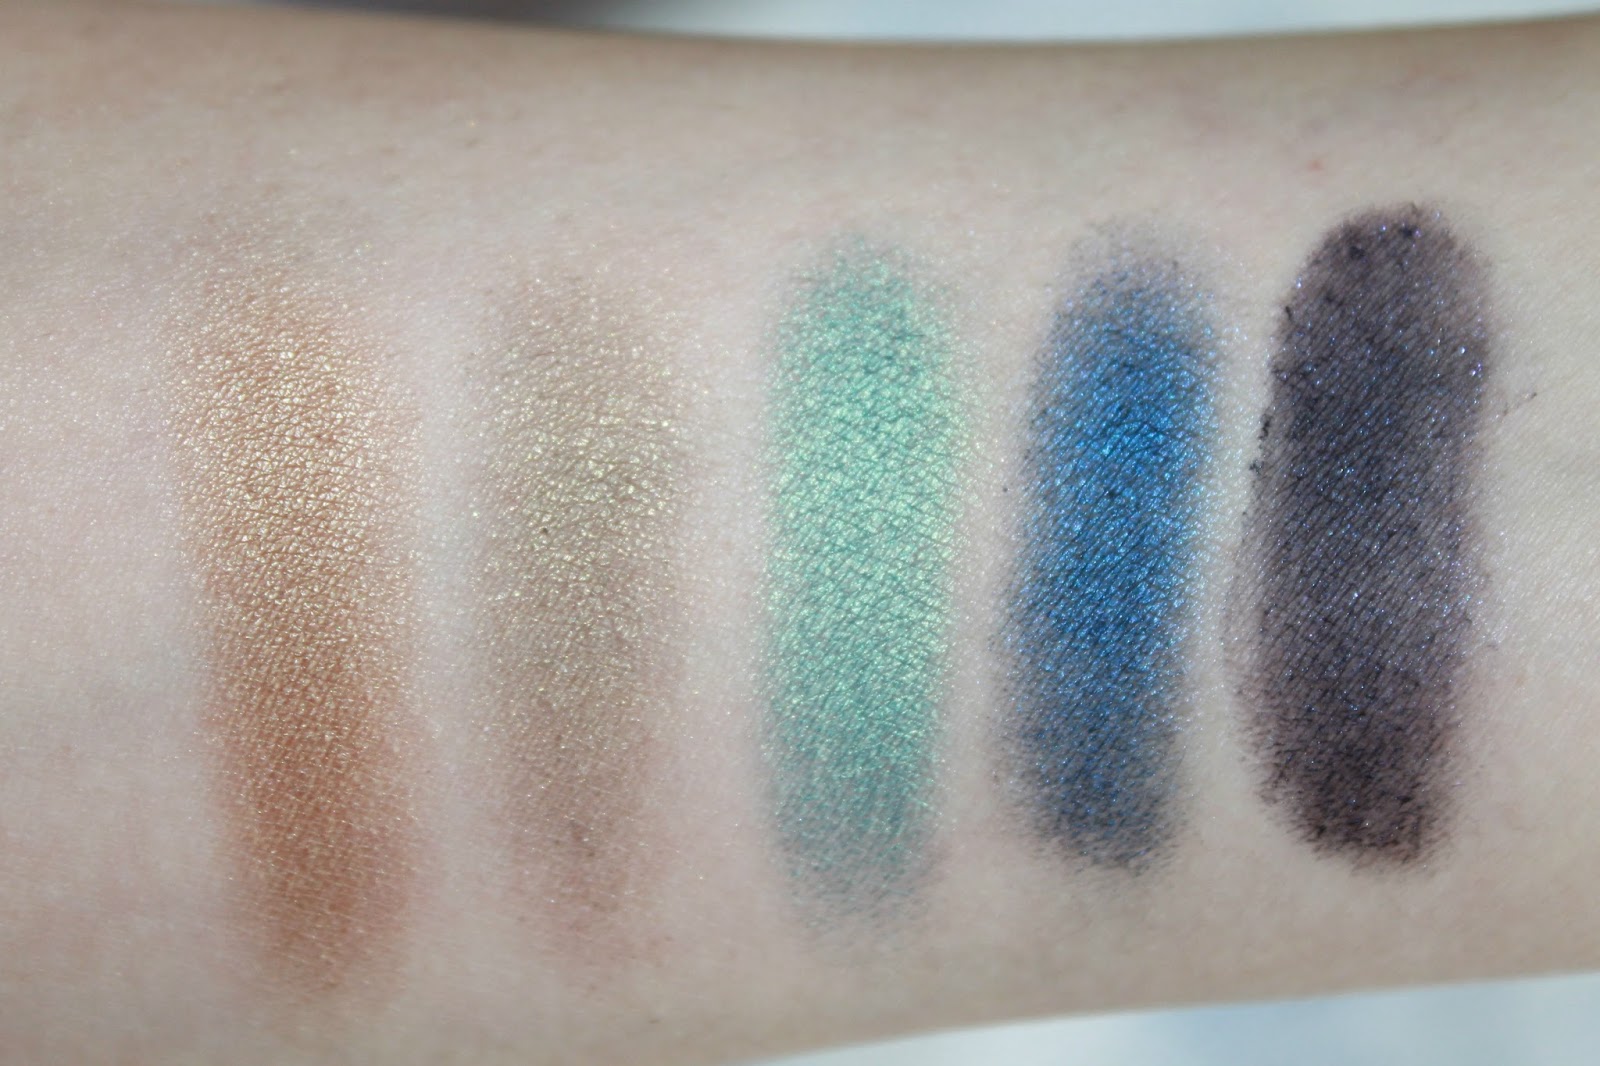
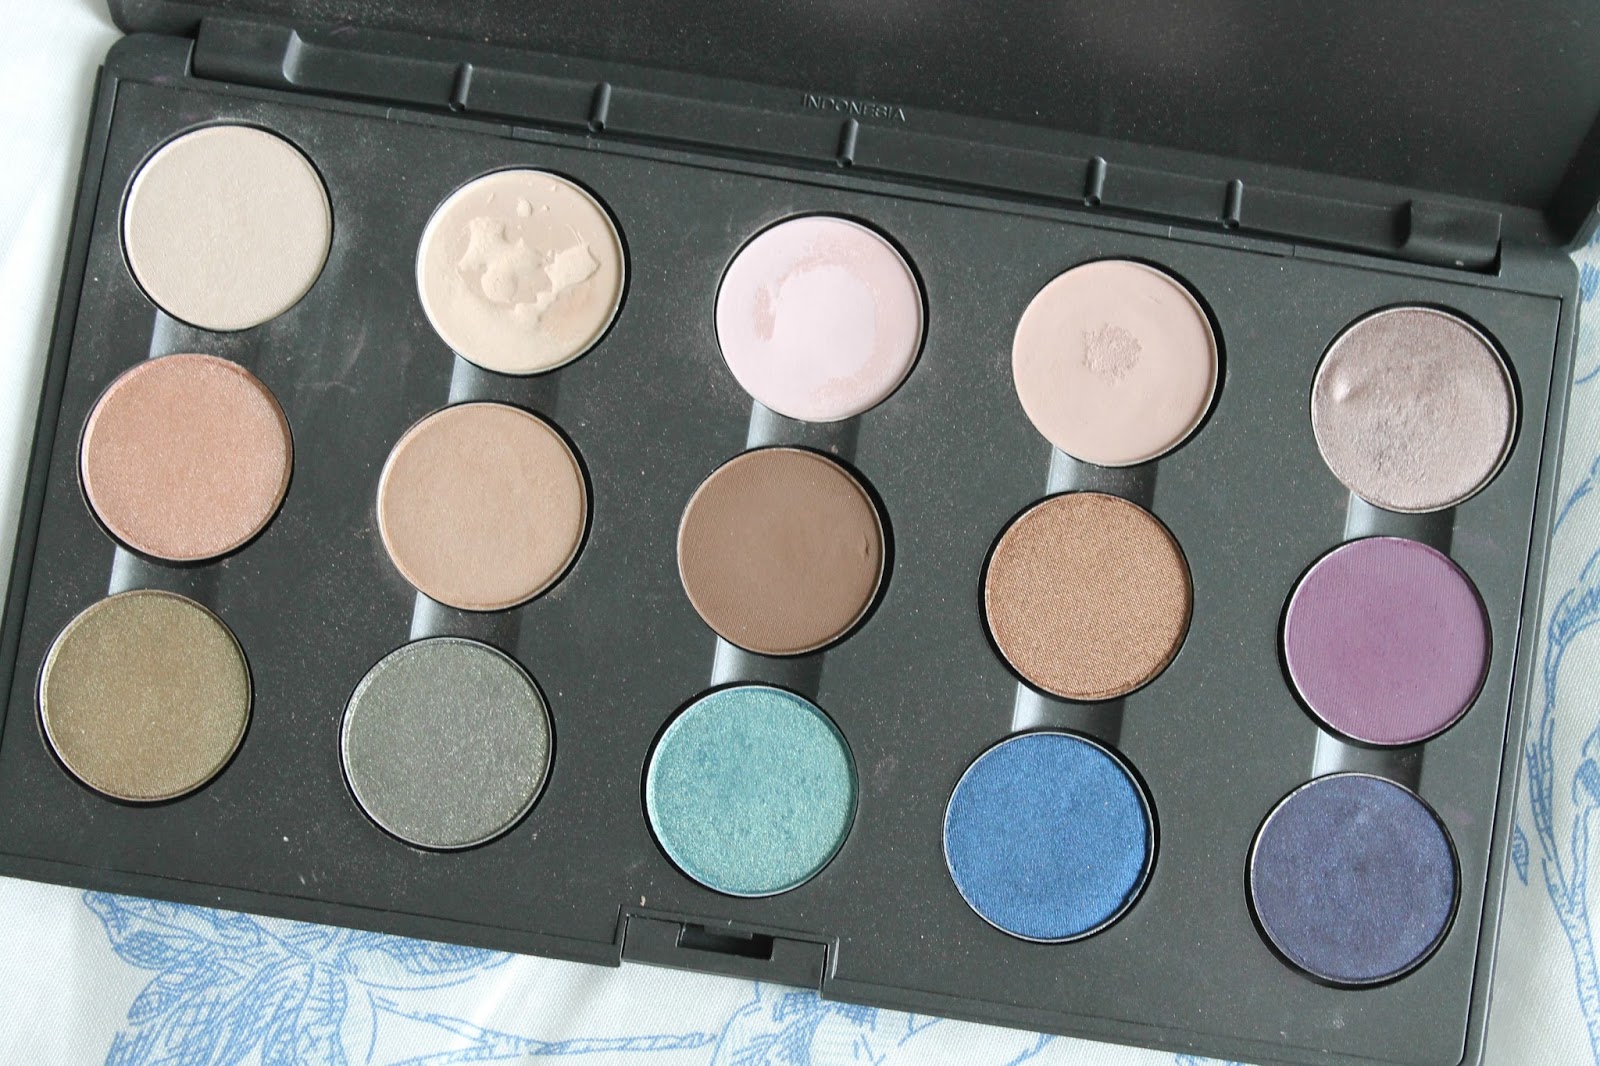
Its taken a few years but I’ve finally filled a MAC palette. At £10 a pop these aren’t exactly the cheapest shadows on the market. I mean £150 for an eyeshadow palette (plus the cost of buying the palette to hold them in) is an insane amount of money. However, I’ve managed to pick most of these up either in blog sales/during debenhams promotions/with my debs reward points and from birthday/Xmas gifts. I still have the old style palette, I know they’ve updated them since. I think you have to buy the insert separately now? so more expense basically! I generally find MAC shadows to have good pigmentation. The matte shadows tend to be on the drier side but still have good pigmentation and are long wearing. Below, I have a little rundown of the shades I own, the ones I consider to be must haves and some known dupes.

From left to right:

Shrooma light beige with shimmer (satin finish) – soft, smooth & pigmented. The swatch doesn’t do it justice. A must have neutral. Known dupes: wet n wild walking on eggshells palette (lightest shade), makeup geek shimma shimma, milani classic beige.

Brulecreamy beige (satin finish) – soft, smooth & pigmented but slightly on the powdery side. Known dupes: milani almondine, wet n wild brulee, urban decay foxy.

Yoghurtsoft pale pink (matte finish) – slightly dry but well pigmented. Known dupe: wet n wild lust palette (light pink shade).

Malt –  neutral beige (matte finish) – slightly dry but good pigmentation. Know dupes: wet n wild lust palette, milani french vanilla.

Satin Taupecool toned mauve taupe brown (frost finish) – soft, smooth & pigmented. A must have. Know dupes: wet n wild nutty, inglot 402 pearl, nyx iced mocha.

from left to right:

All That Glitterssoft beige with gold pearl (veluxe pearl finish) – soft, smooth, pigmented. A must have. Know dupes: urban decay sidecar, nyx champagne, cover girl mink.

Erasoft golden beige (satin finish) – buttery smooth, soft, pigmented. Very underrated & a must have neutral. Known dupes: chanel fauvre.

Espressomuted gold brown (matte finish) – slightly dry but pigmented. Known dupes: bobbi brown chocolate, sleek storm palette (matte brown shade), body shop brow/liner kit in brown.

Bronzebronze (frost finish) – soft, smooth, pigmented. Know dupes: nyx deep bronze.

Fig 1true purple (matte finish) – slightly dry but pigmented, though not as much as other shades. Know dupes: wet n wild lust palette.

From left to right:

Sumptuous Oliveolive green with gold pearl (veluxe pearl finish) – soft, smooth & pigmented. Known dupes: milani antiqued gold, inglot 433 pearl, nyx herb.

Greensmokegreyish green (lustre finish) – I think mine has turned into a dud over time as it now feels really dry with a  lack of pigmentation. I’ve had mine a while but I’m pretty sure it wasn’t like this when I first bought it. Known dupes: maybelline mad for mauve palette (green shade).

Steamyblue green with gold pearl (frost finish) – smooth, soft & pigmented. Known dupes: nyx jungle fever, milani clover.

Deep Truth true metallic blue (frost finish) – smooth, soft & pigmented. Known dupes: nyx atlantic, milani blue my mind, inglot 428.

Contrast dark navy blue with blue pearl (velvet finish) – slightly dry but good pigmentation. Known dupes: nyx morocco, nyx lake moss trio.

My favourites from these are satin taupe, shroom and era, though I do enjoy using the matte finishes as I find them really long wearing. The only bad shade in these is greensmoke but I’m not sure if its because I’ve had it a while. I probably need to repurchase as I’m sure it was better quality when I first purchased it. Overall, MAC shadows are good quality, though some are better than others. I still have quite a few more shades on my wishlist. What are your favorite MAC shadows? 

Add more glamour and flair to your natural lashes. Visit the salon to get professional eyelash extensions Honolulu done quickly and expertly. These lashes are applied carefully after you select the length you like best. They come in short, medium and long lengths. These quality lashes are made to last for weeks and give you the beautiful, easy-wearing look you want for everyday wear or just for special occasions.

Make an appointment now. Your lash technician will work with you to select the style and length that you like best and that flatter you most. Once you choose them you simply lay back and allow the procedure to take place. It is safe, painless and you will come away looking stunning.

You need to care for them as you are instructed in

the perfect hair oil?

Hair products and I have had a very love/hate relationship over the years. There’s only a few hair products that have really wowed me. Having oily roots and dry ends is a tough task to manage and a few years ago, I would have never entertained the thought of using a hair oil but these days, its a different story.

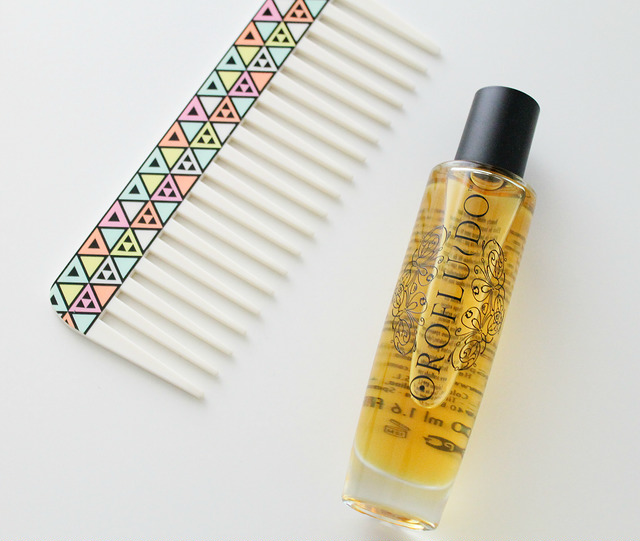
I guess you could say I’ve been converted. OK, I’ve only ever used two hair oils (the above and macadamia) but both of them get the thumbs up, though I think this one may just have the edge. Orofluido Hair Elixir c/o Hairtrade £11.89 contains three organic natural oils – argan, cyperus and linseed, which aim to strengthen, smooth and add shine. You can use this on both dry and wet hair. On wet hair, it aims to reduce drying time, add body and movement and make hair easier to comb. I’ve been using the oil on both damp and dry hair – usually I’ll put a small amount on before styling and add a little more when its fully dry. I find it works well used either way – my hair has a bit more movement to it and it gives my hair more shine when dry.

The texture is really thick so less really is more with this stuff. However, it feels really lightweight once applied – it doesn’t leave any residue at all, its pretty undetectable. A major plus point is the delicious scent. It literally smells like a MAC lipstick, which is all good if you’re a vanilla lover!
I’ve been using this oil for weeks and I’ve really noticed a difference in my hair condition. My hair feels much smoother, sleeker and overall healthier, whilst the ends are less dry. My hair is just so much more manageable *does happy dance*. If you’re a fan of hair oils, then this is definitely one to consider!…

IMPROVING YOUR BLOG PHOTOGRAPHY!

When I started blogging, one of the first things I struggled with was photography. I knew pretty much nothing about taking photos and its still something I’m trying to get to grips with.
My blog photography is very much work in progress. Even though I’m quite a creative person,
My blog photography is very much work in progress. Even though I’m quite a creative person, its not something that comes easily to me. I’ve learnt a few things along the way and I’d like to think my photos have improved over that past two years that I’ve blogged. Today, I have a few tips to share – this wont be anything too technical but I’ll link a few other bloggers posts that explain the tech side way better than I ever could.

GET TO KNOW YOUR CAMERA

Although I do have a dslr camera (canon 1100d – which I would recommend if you’re looking for a beginners dslr) I actually bought it before I started blogging. Knowing what I know now, I would definitely say that you don’t need a fancy camera for blog photos. You can get good quality digital cameras fairly cheap so you really don’t need to spend a lot of money. Its easy to get sucked into with everyone else is buying and what other bloggers are using but if you have a budget, theres no need to go over it. If you are looking for a new camera, I recommend this site where you can have a look at different camera/functions etc. Also don’t be afraid to go instore and ask for assistance with purchasing. The main thing with a camera is getting to know how it works – there should be some guides online/youtube and also if you can, spend some time playing around with the functions, taking photos and seeing how they look when you upload them.

TURN OFF THE FLASH

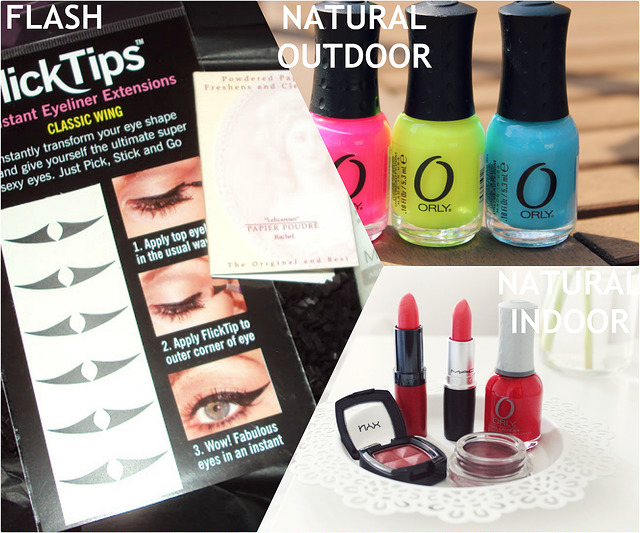
When I first heard this suggestion from other bloggers, I couldn’t understand it. I used to take all my photos with the flash on – it was like my best friend. It was only when I started to play around with my camera that I realised how harsh it really looks.

PHOTO
With flash, the light bounces off certain areas, whereas with natural lighting it just looks far nicer. Luckily, now the weather is improving, its far easier to make the most of the light available. When indoors, I try to take my photographs as near to a window as I can. I don’t own any lighting buts its something I may consider in winter. Temporary Secretary wrote a great post for fashion bloggers and lighting in this post.PHOTO EDITING
Again, this is something I never really bothered with in the early days, apart from cropping. These days I do edit my photos a little more. Gwen from This Fashion is Mine wrote an amazing post on photo editing here and this is pretty much how I now edit my photos. However, you don’t need photoshop to edit your photos. I like to use ipiccy as well – you can work with curves, levels and saturation on there. Its less complex than photoshop but still a good (and free) programme to use.

BACKGROUNDS

A nice background can make a huge difference to a photograph and give it that something extra. I like to use either my ikea helmer, notebooks, makeup bag, trays, magazines etc. You could really use anything – if you’re stuck for something try taking a few free wallpaper samples from a DIY shop. I would say try not to use anything that looks cluttered so the products you’re focusing stand out. You could try different things. I usually take around 50 pictures for each blog post – sometimes they might look good on the camera screen but once uploaded they might not look right so I like to take a lot of photos.

SIZING

Finally, sizing your photos to a medium/large size can really help them to stand out on your blog. You can resize your photos to all the same size by reading this post I wrote not too long ago. I find smaller pictures can get lost within the text and nice, clear photos will help to draw readers into the blog post.
These are just a few things I’ve learnt, like I said I’m no expert and I try not to get too hung up over the fact that my photos might not look quite as good as others. If you struggle with photography like I do, try to focus on your content and just do the best you can. As I always say, blogging is meant to be fun so try not to fret too much!…

HOW TO BLOG WHEN YOU’RE BUSY

Trying to blog when you have a million other things to do is no easy task. Whether its work, academic studies, loved ones..theres always something that can make it difficult time wise to blog. There’s nothing wrong with taking a break now and then – I think it can actually help to refocus and refresh your ideas, obviously unless blogging is your primary source of income and then it might be a little more difficult. However, how often you blog is really up you. Putting pressure on yourself to blog is never good but blogging regularly can be achieved without compromising the quality of your posts.

LISTS, LISTS, LISTS…
Being organised and prioritising your workload is the key to blogging regularly. I write lists all the time as it helps me to stay focused. Keeping a notebook or several notebooks and writing down blogging ideas, lists for what you want to blog about, products to review, photos that need to be taken etc is a great way to stay organised. Making these into checklists so you can tick off when completed helps to keep everything flowing.

CREATE A BLOGGING SCHEDULE…
By blogging schedule, I mean a monthly chart where by you can state what blog post you are going to publish on a certain day. There are lots of free monthly calendars on the net that you can print off to do this. I use one every month but I don’t stick to it religiously – sometimes I’ll change the day of a post but its a good way to plan out your posts in advance.You can find a free printable monthly calendar which is perfect for making a blogging post schedule.

CREATE AN AREA FOR PRODUCTS TO REVIEW
I always have a few products that I want to write about and need to test out. The best thing I did was buy a small basket from Morrisons (for about £1.50) to keep these products in. Its just a much easier way of keeping everything organised, rather than having all your products jumbled together. You can get things like plastic storage from pound shops and places like wilkinsons so its not something you need to shell out loads of money for but it helps to keep lists and schedules in sync.

MAKE THE MOST OF YOUR FREE TIME
If you have a free day or even just a couple of hours, use that time to take pictures, write blog posts and be productive. I always take my blog photos in bulk and try to write several posts in one go – it doesn’t always happen as I’m easily distracted. Scheduling your posts throughout the week allows you to still be an active blogger without eating into your time.

REMEMBER TO GET YOUR BLOG POSTS OUT THERE
Once you’ve posted your blog posts, remember to get links to your posts out there on the web. I would highly recommend having a twitter account if you don’t already have one as its a good way to help increase your views. You can schedule tweets via various apps, such as hootsuite and if you use bloglovin, you can sync it to your twitter/facebook account so the links to your recent posts are published on your social media accounts.

I hope this was helpful in some way. Don’t worry if you really don’t have time to blog and don’t put pressure on yourself either – its your online space and blogging is meant to be fun!…

A LITTLE RADIANCE PLEASE…

Glowing skin is something I rarely achieve without a bit of help. Using a good highlighter really perks up my skin and adds that little something extra to my makeup.

I’ve found some great highlighters at both ends of the price spectrum. Today I’m sharing my the majority of my collection.

makeup_highlighters_review

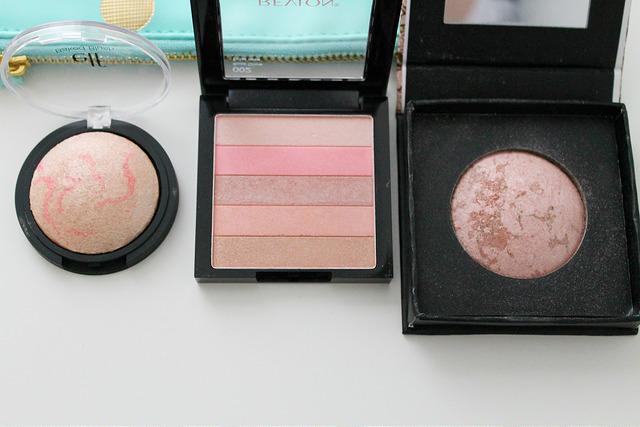
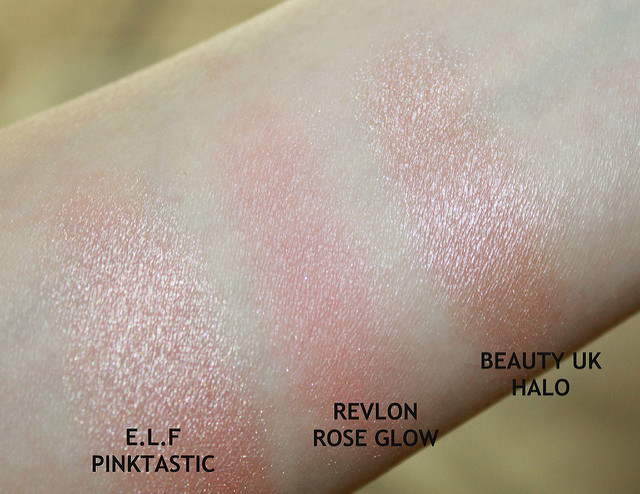
E.L.F BAKED BLUSH – PINKTASTIC £3.95
This is meant to be a blush but on my pale skin, its far better as a highlighter. Its a pale pink highlighter with subtle gold tones and its meant to be a good dupe of MAC’s MSF in soft and gentle. The texture is soft, smooth and pigmented and it wears for around 7-8 hours on the skin before fading. Really nice for adding a subtle glow on cheeks and under eyebrows.REVLON HIGHLIGHTING PALETTE – ROSE GLOW £8.99
On the outside, it looks similar to one of  Bobbi Browns shimmer bricks – on the inside this is billed as a mix of blush and highlighter. Rose Glow is a mixture of five complimentary shades of pink, champagne and beige, which combined makes a pretty light pink shade. The texture is powdery and theres a lot of shimmer in here so its one probably better used in the evening.
BEAUTY UK BAKED BLUSHER – HALO £3.99

Like the ELF product, whilst this is billed as a blush, its far more suitable as a highlighter. Its a very light pink champagne shimmery highlighter that looks stunning when applied to the face. Again I’ve read its meant to be a dupe of MAC’s MSF in soft and gentle and its similar to the E.L.F blush so you don’t really need both. For £3.99, you really cant go wrong with this product – its highly pigmented and smooth, without being too powdery. I can imagine it would suit a range of skin tones too!
HIGHLIGHTER_SWATCHES

The E.L.F swatch is slight blurry – blogger problems!You can see a better swatch is this post.

higher_end_highlighter_review
 

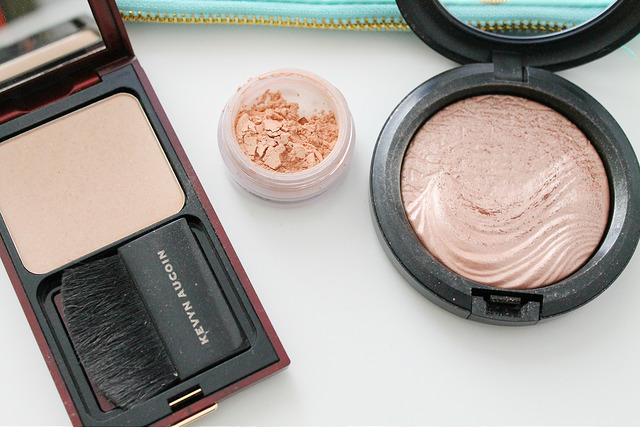
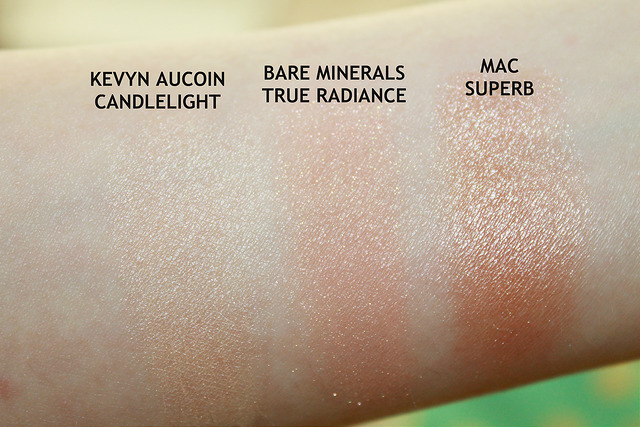
KEVYN AUCOIN CELESTIAL POWDER- CANDLELIGHT £35
Typically, my most expensive highlighter is my favourite. This is just such a subtle powder that it adds a beautiful luminosity to the skin. Its a golden apricot powder that gives a soft focus finish. It kicks up a bit of powder in the pan so I prefer to apply it with a different brush to the compact (you don’t get a brush with it anymore but I recommend a fan brush to apply). Perfection.

BARE MINERALS FACE POWDER – TRUE RADIANCE 
A quick mention for this powder as you cant seem to buy it anymore. I’ve had this a while and I’m not sure if it came as part of a kit but its still a product I use from time to time. True Radiance is a pinky brown powder that adds a little bronze and radiance in one. I only use a tiny amount as it can look too obvious on my pale skin if I apply too much. You can get different coloured versions of this powder and its definitely one to look at if you don’t mind loose powder products.

MAC EXTRA DIMENSION SKIN FINISH – SUPERB
This is another product you can get hold of at the moment – well unless you give ebay a try but I wanted to mention it as its one of my favourites and MAC have released this a few times since I purchased mine so no doubt it will show up again at some point. This is a highly pigmented champagne/peach metallic highlighter, similar to Estee Lauders Gelees Illuminating powders. Definitely one to pick up if its re-released!
HIGHEND_HIGHLIGHTER_SWATCHES

LIQUID_HIGHLIGHTERS

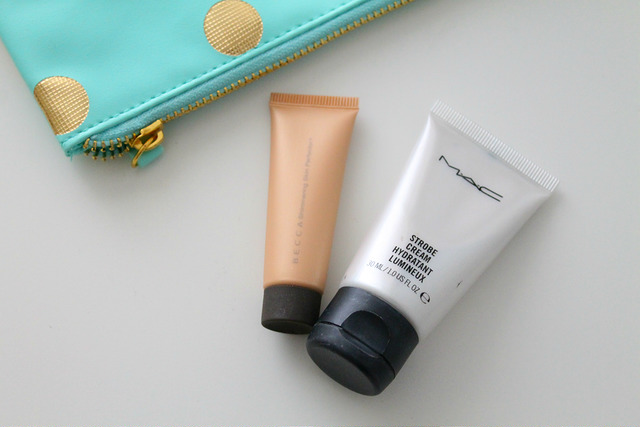
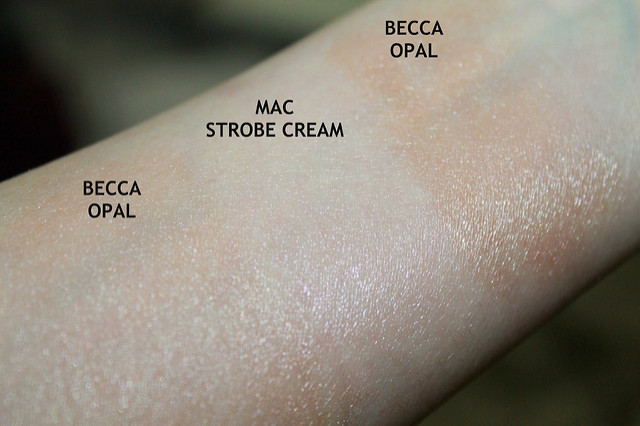
BECCA SHIMMERING SKIN PERFECTOR – OPAL £33
Probably my least used highlighter as I only have a mini sample and I think this is possibly too warm for my skin tone but its a water based liquid highlighter in a warm gold shade. It gives a gorgeous glow and can be mixed with foundation, moisturiser or used alone.

MAC STROBE CREAM £22.50
A brightening cream that helps revive tired looking skin. This can be used under makeup or mixed with foundation. I love mixing this with a powder concealer and using under my eyes as its really helps conceal and brighten my dark undereye circles. It adds a really gorgeous glow to the skin and perks it up for a naturally radiant look.

LIQUID_HIGHLIGHTER_SWATCHES
Whats your favourite highlighter?

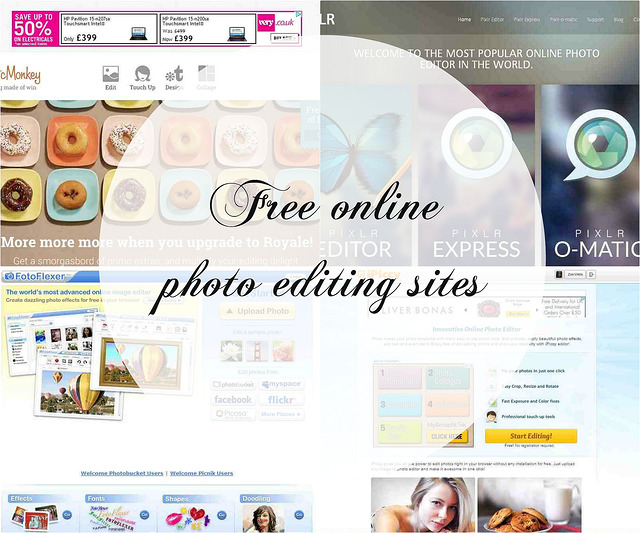
The Best Free Online Photo Editing Sites

Editing your photos can be a big blogging chore. Luckily, there’s a few free online sites that can help make your blog photos so much nicer. Whether its brightening a photo, making a blog banner or mocking up a collage, I’ve got a round up of the best free photo editing sites on the net.

Pixlr
This is very similar to photoshop in its layout. Its more complicated to use than other free sites but there are a few tutorials on the web. Pixlr editor is the main section you need for doing everything from photo editing to making collages for wishlists etc. There aren’t as many features as photoshop but it has what you need for brightening photographs, cropping, resizing. For fonts, you can use the ones stored on your computer or new ones you download.

Picmonkey
Probably the easiest editing site to use. There are limited basic features but you can pay for extra ones – for photo editing I personally feel that the free functions are fine. There are a few different fonts to use and the you can crop, resize, and brighten though there are no curves/levels feature. A lot of the time I find that picmonkey doesn’t load or certain features wont load so it isn’t the most reliable.

ipiccy
Similar to picmonkey but with some extra features, such as levels/curves for brightening photographs. Its also really easy to make collages with the collage tool and some nice fonts. Its definitely my favourite editor as its simple to use and always loads quickly.

Fotoflexer
Similar to ipiccy but some less features. There are some really nice handwritten style fonts on here so its nice for adding text. I think ipiccy and pixlr are better for actual photo editing though.

A few others to mention are photoscape which although free, needs to be downloaded – I’ve only just downloaded it so I haven’t used it much but first impressions aren’t great. I think you’re better sticking to the online editors to be honest. Another is befunky, which I’ve only used once but it looks similar to picmonkey.
Overall, free online photo editing sites are definitely good enough to use for editing blog photos or making a blog banner/collages. Photoshop is much more advanced but I don’t feel you should splash out on it for the benefit of blogging. If there’s any other site you can recommend let me know in the comments!…

html tips: how to resize blog photos to the same size

Today I have a super quick tutorial on how to size all your blog post pictures to the same size without having to manually do it every time you post.

First, its a good idea to back up your blog template in case anything goes wrong. You can do this by going to the template section in your blogger dashboard and clicking on backup/restore which will give you the option to download your template.
To resize your photographs all you need to do is add a little coding and this can be easily done by clicking on the customise button in your template section – go to advanced – scroll down to add css and add the following code;

.post-body img {
width: 600px!important;
height: auto!important; }

The text in yellow is the blog post photo width and you can change this to your desired width if its too large for your blog. I currently use 600px images in my blog posts so you have an idea of how wide they are. As the height is set to auto, your images wont be distorted. This coding will make the images in all your blog posts the same size. I hope this was helpful and if you have any problems just let me know in the comments below.…

HTML TIPS & TRICKS: SIDEBAR BORDERS

Its been a good few months since I wrote one of these posts but I thought I’d continue with the series as I still have a few things to share. If you want to see previous html posts click here.

I thought I’d continue where I left off which is styling the sidebar – you can find out how to change side fonts and backgrounds here and here. As I’ve said before, I’m not a professional web designer – I’ve simply found a few ways to customise a blogger template by endless searching and trial and error.

The sidebar is good for showcasing aspects such as subscribers, the blog archive, sponsors etc. There is a very easy way to make to the sidebar look attractive without having to mess around with your html template. Firstly, its a good idea to save your current template in case anything goes wrong. That way you don’t have to worry if you make a mistake. (To save – just go to the template section on your blogger dashboard and backup/restore. You will then be given the option to download your template to your computer!)

Adding a border (like I currently have) is a great way to make your sidebar standout and separate it from all your other content. To add a simple standard border around your sidebar, firstly you need to go to the template section on blogger – customise template – advanced – add css. In the blank box add the following code;

.sidebar {
border:  1px solid #000000;
}

This coding will give you a standard black border around your sidebar.

If you wish to change the thickness of the border, all you need to do is increase the value of the px in yellow.
To change the colour – just change the colour code in blue to the one you desire – you can find various html colour codes here.

If you dont want a solid line border, you could add a dashed border instead. To do this just use the following coding (again the thicnkess and color can be changed as above).

.sidebar {
border:  1px dashed #000000;
}

Or to have a dotted border use the coding below

.sidebar {
border:  1px dotted #000000;
}

I hope this was helpful. If you have any questions leave them below and I will do my best to answer. If theres any other html tips you’d like to see just let me know and I will see if I can help!…

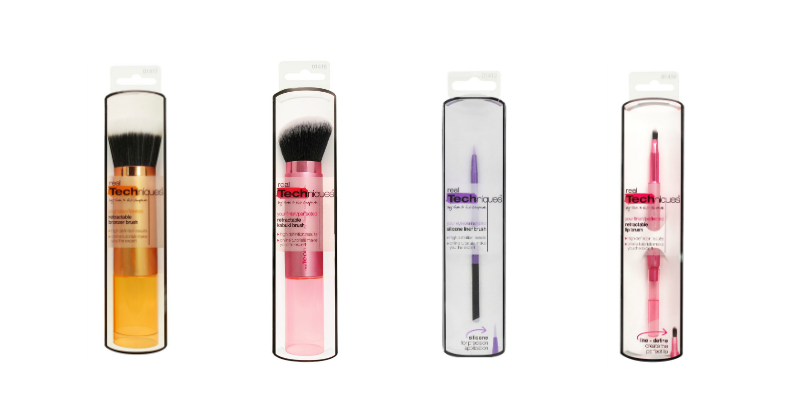
NEW REAL TECHNIQUES BRUSHES FOR 2014

Look what I’ve just spotted!new real techniques brushes. I actually found these on amazon though they’re not available to buy yet so I’m guessing in the next few weeks they’ll be able to purchase. From left to right;

1. Real Techniques Retractable Bronzer Brush – £12.99
Expertly blend bronzer or finishing powder. Load up the brush, pop the lid on and go!

2. Real Techniques Retractable Kabuki Brush – £11.99
Evenly apply powder, blush or bronzer. Load up the brush, pop the lid on and go!

3. Real Techniques Silicone Liner Brush – £5.99
High tech silicone tip for effortless enhanced eyes. The ultimate tool for smooth,precise application of liquid or cream liner.

4. Real Techniques Retractable Lip Brush – £6.99
Ultra-firm tapered tip applies colour smoothly and expertly lines the lips for added definition.…