Category: Blogging 101

HTML Cheat Sheet For Blogger

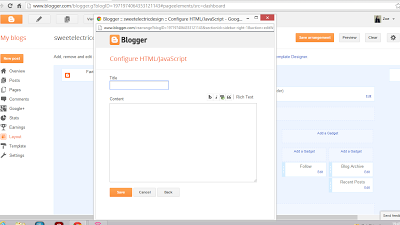
I’ve uploaded a few html tutorials in the past but today I thought I’d do a little update and add a few more popular codes. These are all really easy to apply to your blog and you can add them via the template designer in blogger. Simply go to the add css section in the template designer and copy and paste the coding you want into the blank box. click apply and you’ll see the changes. Sometimes blogger likes to play up and not co-operate so if you don’t see the changes straight away, you may need to copy and paste into the html directly (above the ]]></b:skin> ).

Centreing the post header

.post-title {
text-align: center;
}

Centreing the date header

.date-header {
text-align: center;
}

Centreing the sidebar headers

.sidebar h2 {
text-align: center !important;
}

Centreing the page titles

.PageList {text-align:center !important;}
.PageList li {display:inline !important; float:none !important;}

Re-sizing blog photos to the same size

.post-body img { width:600px; height:auto; }

you can increase or decrease the number in yellow to change the width of your photos

Increasing space between the sidebar and post area

#sidebar-right-1{
position: relative;
left: 40px !important;
}

you can increase or decrease the number in yellow to change the size of the space

Increasing the space between your posts

.post-footer {
margin-bottom: 85px!important;}

you can increase or decrease the number in yellow to change the size of the space

Adding a border to the sidebar

.sidebar {
border: 1px solid #000000;
padding: 5px;
}

You need these codes besides having your own youtube channel. Videos help with audience retention and google loves low bounce rates. A viral video or two can really change everything. If you’re interested in cheating a bit and looking for the best site to buy real views for your videos then you can visit the link provided 

You can change the number in yellow to change the width of border and size of padding. You can change the colour code in blue to the shade of your choice – you can find html colour codes here
If there’s any coding you’d like to see, let me know in the comments below!…

A FEW BLOGGING MYTHS…

1. Blogging will get you lots of ‘freebies’.
One of the perks of blogging is receiving things to review free of charge. Having said that, theres no guarantee just because you have a blog, you’re going to receive lots of products. The reality is that there are far more bloggers than samples. Blogs that only start for the purpose of getting products wont last long. Yes, if you work hard at your blog, put out great content and have passion then opportunities are likely to appear but they shouldn’t be expected or taken for granted.

2. Looking like a supermodel will get you lots of subscribers.
Now, this is a tough one because for fashion blogging then I guess looks do play a part somewhat. However, you don’t need to look a certain way to gain a readership. I read lots of blogs and for most of them, I have no idea what the writer looks like. If your content is good then people will read it. I’ve never read a blog because of what the writer looks like, maybe they are some people who do but in my honest opinion those people will get bored very easily if they’re not there for the content.

3. You need to make youtube videos to be a blogger.
A lot of bloggers upload videos on youtube. It’s something I considered until I actually got in front of a camera and froze – yep its not for me and I highly doubt I ever will. If its something you want to do then definitely give it a go. However, its not necessary and it doesn’t make you any less of a blogger because you’re not on there. I think some people think they’ll automatically become the next Zoella but it takes a lot of hard work and in all honesty a lot of likability (and luck?) to become successful on youtube.

4. Blogging will make you rich?
Well if only!Ha but seriously blogging isn’t an easy path to make money. Yes there are ways to monetise your blog and some people are lucky enough to earn a living from it. However, for most blogging is a great hobby.

5. You need money to be a blogger.
You dont need a lot of money to blog. You can have a read of my post on blogging when you’re broke here. There are lots of things you can blog about without spending a penny. Its easy to think that you need to go out and buy every new product to review but you really don’t. Try and think outside the box when it comes to writing.

6. Blogging is easy.
Before blogging, I never realised just how much time it takes to create a blog and all the things that come with it. You’re a content creator, editor, admin, social media, all in one blogging machine and that eats up a lot of time. Yes its very enjoyable but like everything, it has its ups and downs, frustrations and all that jazz. If you’re passionate then investing time and energy is 100% worth it!

7. Everyone lives in a dreamland of white walls, candles, flowers and cosy bedding.
Despite how things often look on blogs/social media, no-one has a perfect life or lives in a dream house filled with incredible things. Remember people only show snippets – everyone has their bad days and has their own struggles. In reality, I’m sure most bloggers are just like you and me and no-one is perfect despite perceptions.…

IMPROVING YOUR BLOG PHOTOGRAPHY!

When I started blogging, one of the first things I struggled with was photography. I knew pretty much nothing about taking photos and its still something I’m trying to get to grips with.
My blog photography is very much work in progress. Even though I’m quite a creative person,
My blog photography is very much work in progress. Even though I’m quite a creative person, its not something that comes easily to me. I’ve learnt a few things along the way and I’d like to think my photos have improved over that past two years that I’ve blogged. Today, I have a few tips to share – this wont be anything too technical but I’ll link a few other bloggers posts that explain the tech side way better than I ever could.

GET TO KNOW YOUR CAMERA

Although I do have a dslr camera (canon 1100d – which I would recommend if you’re looking for a beginners dslr) I actually bought it before I started blogging. Knowing what I know now, I would definitely say that you don’t need a fancy camera for blog photos. You can get good quality digital cameras fairly cheap so you really don’t need to spend a lot of money. Its easy to get sucked into with everyone else is buying and what other bloggers are using but if you have a budget, theres no need to go over it. If you are looking for a new camera, I recommend this site where you can have a look at different camera/functions etc. Also don’t be afraid to go instore and ask for assistance with purchasing. The main thing with a camera is getting to know how it works – there should be some guides online/youtube and also if you can, spend some time playing around with the functions, taking photos and seeing how they look when you upload them.

TURN OFF THE FLASH

When I first heard this suggestion from other bloggers, I couldn’t understand it. I used to take all my photos with the flash on – it was like my best friend. It was only when I started to play around with my camera that I realised how harsh it really looks.

PHOTO
With flash, the light bounces off certain areas, whereas with natural lighting it just looks far nicer. Luckily, now the weather is improving, its far easier to make the most of the light available. When indoors, I try to take my photographs as near to a window as I can. I don’t own any lighting buts its something I may consider in winter. Temporary Secretary wrote a great post for fashion bloggers and lighting in this post.PHOTO EDITING
Again, this is something I never really bothered with in the early days, apart from cropping. These days I do edit my photos a little more. Gwen from This Fashion is Mine wrote an amazing post on photo editing here and this is pretty much how I now edit my photos. However, you don’t need photoshop to edit your photos. I like to use ipiccy as well – you can work with curves, levels and saturation on there. Its less complex than photoshop but still a good (and free) programme to use.

BACKGROUNDS

A nice background can make a huge difference to a photograph and give it that something extra. I like to use either my ikea helmer, notebooks, makeup bag, trays, magazines etc. You could really use anything – if you’re stuck for something try taking a few free wallpaper samples from a DIY shop. I would say try not to use anything that looks cluttered so the products you’re focusing stand out. You could try different things. I usually take around 50 pictures for each blog post – sometimes they might look good on the camera screen but once uploaded they might not look right so I like to take a lot of photos.

SIZING

Finally, sizing your photos to a medium/large size can really help them to stand out on your blog. You can resize your photos to all the same size by reading this post I wrote not too long ago. I find smaller pictures can get lost within the text and nice, clear photos will help to draw readers into the blog post.
These are just a few things I’ve learnt, like I said I’m no expert and I try not to get too hung up over the fact that my photos might not look quite as good as others. If you struggle with photography like I do, try to focus on your content and just do the best you can. As I always say, blogging is meant to be fun so try not to fret too much!…

HOW TO BLOG WHEN YOU’RE BUSY

Trying to blog when you have a million other things to do is no easy task. Whether its work, academic studies, loved ones..theres always something that can make it difficult time wise to blog. There’s nothing wrong with taking a break now and then – I think it can actually help to refocus and refresh your ideas, obviously unless blogging is your primary source of income and then it might be a little more difficult. However, how often you blog is really up you. Putting pressure on yourself to blog is never good but blogging regularly can be achieved without compromising the quality of your posts.

LISTS, LISTS, LISTS…
Being organised and prioritising your workload is the key to blogging regularly. I write lists all the time as it helps me to stay focused. Keeping a notebook or several notebooks and writing down blogging ideas, lists for what you want to blog about, products to review, photos that need to be taken etc is a great way to stay organised. Making these into checklists so you can tick off when completed helps to keep everything flowing.

CREATE A BLOGGING SCHEDULE…
By blogging schedule, I mean a monthly chart where by you can state what blog post you are going to publish on a certain day. There are lots of free monthly calendars on the net that you can print off to do this. I use one every month but I don’t stick to it religiously – sometimes I’ll change the day of a post but its a good way to plan out your posts in advance.You can find a free printable monthly calendar which is perfect for making a blogging post schedule.

CREATE AN AREA FOR PRODUCTS TO REVIEW
I always have a few products that I want to write about and need to test out. The best thing I did was buy a small basket from Morrisons (for about £1.50) to keep these products in. Its just a much easier way of keeping everything organised, rather than having all your products jumbled together. You can get things like plastic storage from pound shops and places like wilkinsons so its not something you need to shell out loads of money for but it helps to keep lists and schedules in sync.

MAKE THE MOST OF YOUR FREE TIME
If you have a free day or even just a couple of hours, use that time to take pictures, write blog posts and be productive. I always take my blog photos in bulk and try to write several posts in one go – it doesn’t always happen as I’m easily distracted. Scheduling your posts throughout the week allows you to still be an active blogger without eating into your time.

REMEMBER TO GET YOUR BLOG POSTS OUT THERE
Once you’ve posted your blog posts, remember to get links to your posts out there on the web. I would highly recommend having a twitter account if you don’t already have one as its a good way to help increase your views. You can schedule tweets via various apps, such as hootsuite and if you use bloglovin, you can sync it to your twitter/facebook account so the links to your recent posts are published on your social media accounts.

I hope this was helpful in some way. Don’t worry if you really don’t have time to blog and don’t put pressure on yourself either – its your online space and blogging is meant to be fun!…

The Best Free Online Photo Editing Sites

Editing your photos can be a big blogging chore. Luckily, there’s a few free online sites that can help make your blog photos so much nicer. Whether its brightening a photo, making a blog banner or mocking up a collage, I’ve got a round up of the best free photo editing sites on the net.

Pixlr
This is very similar to photoshop in its layout. Its more complicated to use than other free sites but there are a few tutorials on the web. Pixlr editor is the main section you need for doing everything from photo editing to making collages for wishlists etc. There aren’t as many features as photoshop but it has what you need for brightening photographs, cropping, resizing. For fonts, you can use the ones stored on your computer or new ones you download.

Picmonkey
Probably the easiest editing site to use. There are limited basic features but you can pay for extra ones – for photo editing I personally feel that the free functions are fine. There are a few different fonts to use and the you can crop, resize, and brighten though there are no curves/levels feature. A lot of the time I find that picmonkey doesn’t load or certain features wont load so it isn’t the most reliable.

ipiccy
Similar to picmonkey but with some extra features, such as levels/curves for brightening photographs. Its also really easy to make collages with the collage tool and some nice fonts. Its definitely my favourite editor as its simple to use and always loads quickly.

Fotoflexer
Similar to ipiccy but some less features. There are some really nice handwritten style fonts on here so its nice for adding text. I think ipiccy and pixlr are better for actual photo editing though.

A few others to mention are photoscape which although free, needs to be downloaded – I’ve only just downloaded it so I haven’t used it much but first impressions aren’t great. I think you’re better sticking to the online editors to be honest. Another is befunky, which I’ve only used once but it looks similar to picmonkey.
Overall, free online photo editing sites are definitely good enough to use for editing blog photos or making a blog banner/collages. Photoshop is much more advanced but I don’t feel you should splash out on it for the benefit of blogging. If there’s any other site you can recommend let me know in the comments!…

HTML TIPS & TRICKS: SIDEBAR BORDERS

Its been a good few months since I wrote one of these posts but I thought I’d continue with the series as I still have a few things to share. If you want to see previous html posts click here.

I thought I’d continue where I left off which is styling the sidebar – you can find out how to change side fonts and backgrounds here and here. As I’ve said before, I’m not a professional web designer – I’ve simply found a few ways to customise a blogger template by endless searching and trial and error.

The sidebar is good for showcasing aspects such as subscribers, the blog archive, sponsors etc. There is a very easy way to make to the sidebar look attractive without having to mess around with your html template. Firstly, its a good idea to save your current template in case anything goes wrong. That way you don’t have to worry if you make a mistake. (To save – just go to the template section on your blogger dashboard and backup/restore. You will then be given the option to download your template to your computer!)

Adding a border (like I currently have) is a great way to make your sidebar standout and separate it from all your other content. To add a simple standard border around your sidebar, firstly you need to go to the template section on blogger – customise template – advanced – add css. In the blank box add the following code;

.sidebar {
border:  1px solid #000000;
}

This coding will give you a standard black border around your sidebar.

If you wish to change the thickness of the border, all you need to do is increase the value of the px in yellow.
To change the colour – just change the colour code in blue to the one you desire – you can find various html colour codes here.

If you dont want a solid line border, you could add a dashed border instead. To do this just use the following coding (again the thicnkess and color can be changed as above).

.sidebar {
border:  1px dashed #000000;
}

Or to have a dotted border use the coding below

.sidebar {
border:  1px dotted #000000;
}

I hope this was helpful. If you have any questions leave them below and I will do my best to answer. If theres any other html tips you’d like to see just let me know and I will see if I can help!…

BLOGGER HTML TIPS AND TRICKS #1

I’m by no means an expert when it comes to blog design but I thought I would share a few easy html tricks I’ve learnt. The good news is that these are super easy to implement – you don’t even need to mess with your blog html coding!

To use any of the following coding all you need to do is go to the template page in blogger > click on customise > go to the advanced section > add CSS > copy and paste the coding you want into the add custom CSS box > click apply to blog button.

*Make sure you save your template before making any changes, then if anything goes wrong you can just upload it again*

Centreing Post Title
.post-title {
text-align: center;
}

Centreing Date
.date-header {
text-align: center;
}

Centreing Sidebar Titles
.sidebar h2 {
text-align: center !important;
}
*To align to the right – just change the ‘center’ to ‘right’*
Centreing Page List/Menu Bar
.PageList {
text-align: center !important;
}
PageList li {display inline !important; float:none !important;}

I hope this was helpful.…

HOW TO: MAKE YOUR OWN BLOG BUTTON WITH A GRAB BOX!

Today, I thought I would show you an easy way of how you can make your own blog button like mine above.
Blog buttons are a great way of getting your blog ‘out there’. By putting a blog button with a grab box on your sidebar, its easy for anyone who likes your blog to put your button on their site or in the case of button swaps it just makes it so much easier!

1. Firstly you need to make a blog button. This can be your blog header resized or you can make one from scratch. If your making one I recommend using picmonkey which is free and easy to use!
I would say a decent sized blog button is around 200px x 150px or anything similar (it really depends on what looks best for your button and blog sidebar.

2. Once you have a button, you need to upload it to a site such as photobucket.

3. Going back to your blog, you need to add the following code into the add html gadget via the layout section of blogger (see below).

4. Add the following code into the html box – Edit: Now updated as the previous coding stopped working!

5. In the pink section you need to delete the text and type the link for your blog homepage, for example mine is http://www.sweetelecricblog.com
In the yellow section delete blog name and type in the name of your blog
In the green section you need to delete the text and type in the link to your blog button – if you’re using photobucket you need to copy and past the direct link code.

6. Click save and voila!Your blog button and grab box will now be visible on your blog!

*The code will also centre your button in your blog sidebar*…

4 RESOURCES FOR GROWING YOUR SOCIAL MEDIA ACCOUNTS

Social media accounts are a great platform for getting your blog and posts out there. I have very little knowledge of social media – I’ll chuck a tweet out and repin a few images and hope for the best. This year, I want to get a bit more serious with my accounts and look into how I can really work them to their potential when it comes to blogging. I use Twitter and Pinterest mainly but I throw a few images out on instagram now and again. If you’re like me and want to know a bit more about how we can improve our social media accounts then this post might prove fruitful. Gaining subscribers on your accounts is a way to really help improve your blog reach – the more followers you have, the more chance that people will see your blog posts. If you want to grow your social media subscribers then the following may help (click the bold title to view the blog page).

Grow your Instagram followers

If you’re like me and clueless about Instagram then this post may help. There are some great tips here.

How to get more Twitter followers


There’s some really useful information in this post, especially if you’re new to Twitter or want to start up an account.

10 Facebook tips

If your blog has a Facebook page then this is for you.

Grow your Pinterest following

If you’ve joined the Pinterest bandwagon then this post is highly recommended. I’m going to implement some of these strategies and see if they work.…

5 RESOURCES FOR OPTIMISING YOUR BLOG & POSTS FOR SEO

Search engine optimisation basically relates to how your blog is placed in search engine results. I’ve already written a post on 5 quick and easy seo tips for bloggers which you can read as a basic starting point. I don’t really consider seo too much when I’m writing on here as its my hobby and I generally like to write in a casual manner. However, for work purposes I do deal with search engine optimisation techniques and I thought it might be useful to share some of the resources that have helped me gain a little more understanding of the subject. There’s a lot to consider when it comes to seo, however if you’re looking to better your blogs standings in search engines (and gain more traffic to your blog) then these are all great resources with very helpful information (p.s. if you have wordpress, I really recommend using the Yoast plugin – its so easy to use).

Anatomy of a blogpost with great seo
A great example of an optimised blog post.

The future of SEO: what to know in 2014
but very relevant now too. How to adapt yourself for the ever evolving world wide web.

How to name your blog photos and why you should
A quick guide for both wordpress and blogger on naming your images.

12 tips and tools for making seo as easy as 123.
A really easy and concise guide to seo.

seo for bloggers: the non techie guide
An easy way to understand seo with some useful tips.…